Teste3: mudanças entre as edições
Sem resumo de edição |
Sem resumo de edição |
||
| Linha 75: | Linha 75: | ||
</gallery> | </gallery> | ||
== [[Arquivo:Dragon Plates.gif|40px|link=]] Missão 01: Unworked Sacred Wood[[Arquivo:Dragon Plates.gif|40px|link=]] == | == [[Arquivo:Dragon Plates.gif|40px|link=]] Missão 01: Unworked Sacred Wood [[Arquivo:Dragon Plates.gif|40px|link=]] == | ||
<table style="margin-left:auto; margin-right:auto;"> | <table style="margin-left:auto; margin-right:auto;"> | ||
| Linha 88: | Linha 88: | ||
Desça e vá para o norte da caverna. | Desça e vá para o norte da caverna. | ||
<gallery mode="nolines" widths=" | <gallery mode="nolines" widths="160px" heights="160px"> | ||
Arquivo:Chegada.png|Local de chegada em Muggy Plains. | Arquivo:Chegada.png|Local de chegada em Muggy Plains. | ||
Arquivo:Wrath of the Emperor Quest Mapa 1-3.png|Suba a escada. | Arquivo:Wrath of the Emperor Quest Mapa 1-3.png|Suba a escada. | ||
| Linha 94: | Linha 94: | ||
Arquivo:Wrath of the Emperor Quest Mapa 1-5.png|Desça as duas escadas. | Arquivo:Wrath of the Emperor Quest Mapa 1-5.png|Desça as duas escadas. | ||
Arquivo:Wrath of the Emperor Quest Mapa 1-6.png|Siga o mapa. | Arquivo:Wrath of the Emperor Quest Mapa 1-6.png|Siga o mapa. | ||
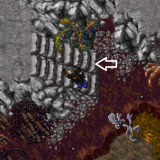
Arquivo:Wrath of the Emperor Quest Mapa 1-7.png|Desça o buraco. | |||
</gallery> | </gallery> | ||
<gallery mode="nolines" widths="160px" heights="160px"> | |||
<gallery mode="nolines" widths=" | |||
Arquivo:Wrath of the Emperor Quest Mapa 1-8.png|Siga o caminho. | Arquivo:Wrath of the Emperor Quest Mapa 1-8.png|Siga o caminho. | ||
Arquivo:Wrath of the Emperor Quest Mapa 1-9.png|Entrada da caverna. | Arquivo:Wrath of the Emperor Quest Mapa 1-9.png|Entrada da caverna. | ||
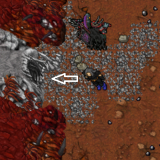
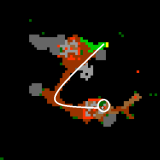
Arquivo:Wrath of the Emperor Quest Mapa 1-10.png|Siga até o circulo branco ''use'' a rope, e suba a escada. | Arquivo:Wrath of the Emperor Quest Mapa 1-10.png|Siga até o circulo branco ''use'' a rope, e suba a escada. | ||
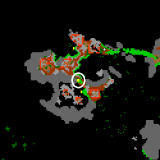
Arquivo:Wrath of the Emperor Quest Mapa 1-11.png|Siga para o norte depois para sudoeste. | Arquivo:Wrath of the Emperor Quest Mapa 1-11.png|Siga para o norte depois para sudoeste. | ||
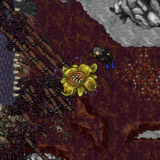
Arquivo:Wrath of the Emperor Quest Mapa 1-12.png|Unworked Sacred Wood. | |||
</gallery> | </gallery> | ||
{{DASH|'''Método:''' | {{DASH|'''Método:''' | ||
* '''Passo 1:''' Use uma [[Pick]] [[Arquivo:Pick.gif|link=]] na [[Unworked Sacred Wood]] [[Arquivo:Unworked Sacred Wood.gif|link]] para obter o [[Sacred Bowl]] [[Arquivo:Sacred Bowl.gif|link=]].}} | * '''Passo 1:''' Use uma [[Pick]] [[Arquivo:Pick.gif|link=]] na [[Unworked Sacred Wood]] [[Arquivo:Unworked Sacred Wood.gif|link]] para obter o [[Sacred Bowl]] [[Arquivo:Sacred Bowl.gif|link=]].}} | ||
== [[Arquivo:Dragon Plates.gif|40px|link=]] Missão 02: Lump of Sacred Clay [[Arquivo:Dragon Plates.gif|40px|link=]] == | |||
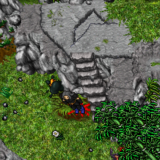
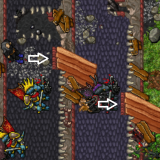
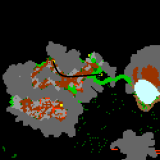
Sua segunda missão é ir para o norte, você irá usar sua [[Pick]] nas plantas. Siga as imagens abaixo. | |||
[[Arquivo:Mission 1.png|250px]] | |||
<gallery mode="nolines" widths="160px" heights="160px"> | |||
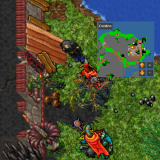
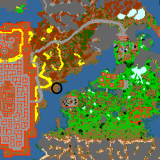
Arquivo:Mission 2.png|Suba a escada e vá para o noroeste. | |||
Arquivo:Mission 3.png|Siga o caminho da imagem. | |||
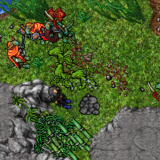
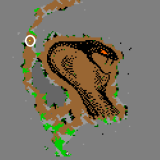
Arquivo:Mission 4.png|Ande até o circulo branco. | |||
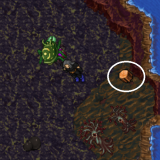
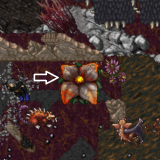
Arquivo:Mission 5.png|1° Você vai encontra a planta. | |||
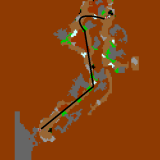
Arquivo:Mission 6.png|Siga para o sul, onde mostra a imagem. | |||
Arquivo:Mission 7.png|Ande para sudeste até chegar no circulo. | |||
Arquivo:Mission 8.png|2° Você pode encontrar a planta. | |||
</gallery> | |||
{{DASH|'''Método:''' | |||
* '''Passo 2:''' | |||
Use uma [[Pick]] [[Arquivo:Pick.gif|link=]] na panta '''1''' para obter [[Lump of Clay]] [[Arquivo:Lump of Clay.gif|link]]. | |||
Use uma [[Pick]] [[Arquivo:Pick.gif|link=]] na panta '''2''' para obter [[Sacred Earth]] [[Arquivo:Sacred Earth.gif|link]].}} | |||
Edição das 17h25min de 12 de outubro de 2023
| Esta é uma página sobre a quest Wrath of the Emperor. Para a criatura, veja Wrath of the Emperor (Criatura). |


Veja também: Quests.
Requerimentos
| Nota: A cada ação feita nas missões com sucesso, a mensagem de "Your questlog has been updated." aparecerá avisando no seu Server Log e será atualizado o texto encontrado no Quest Log. |
Método
Encontre a caverna de Zalamon ao leste de Zao Steppe, (aqui![]() ) e finalmente chegará a hora de passar através da Grande Porta, ao norte da sala, coloque o Dragon Lord Trophy e dê use na alavanca, você será teletransportado para a sala do A Sleeping Dragon.
) e finalmente chegará a hora de passar através da Grande Porta, ao norte da sala, coloque o Dragon Lord Trophy e dê use na alavanca, você será teletransportado para a sala do A Sleeping Dragon.

Aviso, dê use na alavanca.
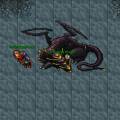
Sala de A Sleeping Dragon.


| Nota: Ao falar com A Sleeping Dragon, passe pelo teleporte do lado esquerdo como mostra a imagem, você entrará em outra sala, pule o teleporte de cima como mostra a segunda imagem. |
Falando com A Sleeping Dragon
 |
Jogador: Hi
A Sleeping Dragon: Hello. Did you came for my mission?.. |


 Missão 01: Unworked Sacred Wood
| Portal de Muggy Plains: |
 |
Desça e vá para o norte da caverna.
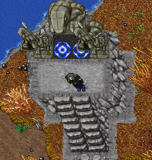
Local de chegada em Muggy Plains.
Suba a escada.
Próxima escada.
Desça as duas escadas.
Siga o mapa.
Desça o buraco.


Siga o caminho.
Entrada da caverna.
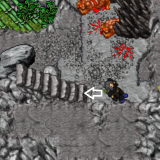
Siga até o circulo branco use a rope, e suba a escada.
Siga para o norte depois para sudoeste.
Unworked Sacred Wood.


Método:
|
Missão 02: Lump of Sacred Clay
Sua segunda missão é ir para o norte, você irá usar sua Pick nas plantas. Siga as imagens abaixo.

Suba a escada e vá para o noroeste.
Siga o caminho da imagem.
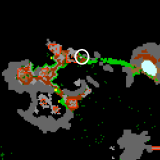
Ande até o circulo branco.
1° Você vai encontra a planta.
Siga para o sul, onde mostra a imagem.
Ande para sudeste até chegar no circulo.
2° Você pode encontrar a planta.


Método:
Use uma Pick |